Tuesday, October 18, 2011

Cutting up Fun! Scissor Work


Cutting up fun with paper! Caroline LOVES to to cut with scissors. However to avoid unintentional haircuts, this work can only be done when mommy can supervise. To prepare the environment, I drew lines on the colored paper construction paper and then cut the paper into 1- inch wide strips. Then I gave Caroline the lined 1-inch strips of paper and scissors. After we cut the paper into various shapes, Caroline used them to create abstract art work.

Cutting Practice Printable:


Cutting Work: Take Two
I love Montessori Print Shop and Montessori for Everyone. These cutting strips (pictured below) are FREE and printable from Montessori Print Shop. After Caroline cut them into squares we pasted them on to card stock and they are now being mailed and delivered to "special" people.


Friday, October 7, 2011

Map of the World with Animals

I first saw Zoo Animals and Where They Live on mymontesssorimoments.com. Then I started an internet search to see how other people were approaching this lesson. These two sites had great ideas: Felt Board World Map and Toddler World Map with Animals, but a little too much work for this mama.

So this is the way we are going to approach the lesson. First I printed this Map of the World, which is free and printable. You will need several copies: One copy for you to color in the continents using the montessori colors. Then I decided it was too much work and I went to Montessori Printshop and paid to print it.

I do not have all the animals like Zoo Animals and Where They Live. I am still trying to round up some of the animals that I know we do own.

Before I introduced the cards, I placed the animals into a bin on the shelf. Caroline enjoyed playing with the animals. She even drew this picture of her giraffe.

The next lesson will be to set up and match the cards and then match up the animals.

Skeleton Fun with Noodles

First, let me say I love Disney's Family Fun magazine and this is where the project idea originated. I did change it slightly, because we do not eat a lot of pasta and I didn't want to spent a lot on pasta. I went to the dollar store and bought Ziti and small shells.

A B


A: This is my version of the Skeleton noodle man.
B: This is the tray I have the prepared with small shells, elbow, ziti, and beans. Also I have black card stock with the skeleton outline and Glue with a dixie cup and Q-tips.


Finally Caroline shows off her skeleton person.


Wednesday, October 5, 2011

Battle Creek Cypress Swamp Sanctuary Vertebrates Field Trip


This year Devon is using the Bob Jones Science Level 3, which begins with vertebrates and invertebrates. From vertebrates the subject went into the five types of vertebrates: fish, birds, mammal, reptiles, and amphibians. This gave me the idea to plan a field trip to Battle Creek Cypress Swamp Sanctuary. After calling the center and planning a date with the Naturalist Shannon, we were set.

The 35 parents, students, and siblings were divided into two groups. Our group took the outside tour first. On the naturalist asked the children to play "I-Spy" and look for evidence of animals. First we spied Cypress Knees, which are roots that grow up and come out of the ground.

We also discovered poison ivy growing on tress and learned that it doesn't bother the animals and give them rashes like
us.


We found evidence that a bird was on the boardwalk by the evidence left behind. Then we began to look up for the bird or any evidence that it may have a nest in the surrounding trees.

Continuing on our walk, we found raccoon tracks, a frog,and these mud piles thatwerehome to crawfish. The raccoon tracks were around these crawfish homes, which made us believe that they eat the crawfish.

We then met the Hawk that was injured and now lives at the Sanctuary, because it can not live in the wild.


The second part of the trip included stations set up inside the nature center.

What lives in the Pond?
The kids were asked to use "cup" hands and see what was living in the pond water. Behind them in a tank was a 20 year old Albino Snapping Turtle. He was a big hit with all the kids.


So, this wasn't a "station" but my Caroline LOVED these stuffed critters.


Amphibian Station
This station had a two frogs and several tadpoles to watch. It also had cards with frog facts and how far the frog could jump. Most kids could jump as far as a Bull Frog.


Skull Station
This station had skulls to pick-up and observe and determine, if the animal had K-9 teeth or not and to guess what type of animal the skull belonged too. We were able to see a bear, deer, beaver, skunk,and possum skull.


Which Beak is BEST?
For this station, the kids were asked to use various tools to gather food and determine which tool was best for what job. For example, a small test tube filled with water was provided and a pipet and a spoon to test which would be best. The pipet would represent the hummingbird beak and the small test tube a flower. This could even be used as a lesson in its self and then you could discuss the various beaks of birds.


Bat Bones
This station had a bat skeleton poster attached to the all and four turtle shells on display. The kids were to compare the bat skeleton poster, the turtle shells, and our human skeleton.


At the end the naturist gave the kids a live animal show featuring a painted turtle and king snake.

Puff ball Magnets


I saw these Puff ball magnets on Mama Jenn's blog and fell in love with them. I went to Walmart and bought the magnets and puff balls. Next I visited the local Dollar Store for cookie sheets and more puffballs.

Today I just let Caroline play with them and create. The picture on the left is her Rainbow. Her first masterpiece was a smiley face.

More Creative ideas for Puff ball magnet fun:

Friday, September 30, 2011

Little House in the Big Woods

Little House in the Big Woods Lap-book

I am using these two lap booking sites ( Lap book from Homeschool Share and Lap book from lapbooklessons.com) and as a jumping point, but I am going to add to it as we go.

Cover page


Instead of the traditional Lap-book, I am using a pocket folder with prongs. I wanted to have more flexibility to add more information and less worrying about how to make it fit into a lap book.

Page One: Where is Wisconsin?
  • Find Wisconsin on a map of the United States (www.enchantedlearning) and label it and Maryland (our home state). I felt that this was a necessary addition to the lap book.


Page 2: Wild Animals. This is taken from this site and I added a pocket to keep them contained.


Page 3: The Smokehouse and Meat Preservation. Again the Smokehouse image is available from this site and the Meat Preservation ia available from this site. Instead of having Devon write out the steps of each, I made little bookmarks and we reviewed how each was preserved and completed a writing assignment with the bookmarks as our prewriting stage.


Page 4: In the Attic and the Butter Churn
In the Attic is an accordion style lap book piece that folds up to only show one item, but five items are folded behind it. Again this may be found on this site. I used this activity to "reread" the selection and reinforce what was in the attic with the girls.

Just under the "In the Attic" I used the Butter Churn fold out to document our butter making experiment. We used a glass jar, whipping cream, and two glass marbles. It took us 22 minutes to shake the heavy cream and to get it to break into buttermilk and butter. We then salted it and because my kids LOVE honey butter we added honey too. We shook our butter while completing the "How to make Butter" steps on the next page.


Again, I choose to make a pocket and give Devon Step One-Ten and then the 10 steps of butter making on another sheet and she had to match and glue them together. We did this while shaking our butter in turns. After we competed this pocket, we moved onto the chores mini-book. Both mini-book templates are available here. These pages lead to a great conversation about the fact that Ma made butter only on Thursdays and it had to be enough to last the week. Every other day of the week had its own chore. We talked about how much time it would talk to churn enough butter for the week, when it took us 20 minutes for us to make our little bit of butter.


Wednesday, September 21, 2011

Animal Classification

This year Devon is using the Bob Jones Science Level 3, which begins with vertebrates and invertebrates. From vertebrates the subject went into the five types of vertebrates: fish, birds, mammal, reptiles, and amphibians. Using these Animal Classification Cards for both girls (PreK and grade 2).

Above: Caroline worked through the cards to sort for "furry" animals and not "furry" animals.
She ended up with birds and mammals together in the furry pile, but then we sorted again into fur and feathers.


For Devon, I placed the title cards in a row and told her to sort based on mammal, bird, fish, invertebrate, amphibians, and reptiles. She really enjoyed herself.

Friday, September 9, 2011

Play dough and Learning Mats


Recipe for Play dough

WOW, what a day! Caroline and I made play dough today for our "work" time. Work time is when Caroline (3y)and Devon (7y) both have school work to do. Of course, Devon is a tad upset that Caroline's work is play dough.

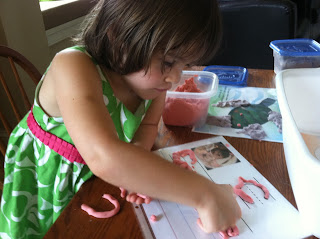
So, I found this super site of Preschool Corner that offers FREE play dough mats. I print these mats and place them into protective sleeves for continuous play. Then I created a name mat for Caroline to "make" her name in play dough. She did a GREAT job, yes I am bias.


Monday, April 11, 2011

It Looked Like Spilt Milk

It Looked Like Spilt Milk read aloud on youtube

Art Activity of painting "it looked like______"

Science Link Color Changing Milk
It's an explosion of color! Some very unusual things happen when you mix a little milk, food coloring, and a drop of liquid soap. Use this experiment to amaze your friends and uncover the scientific secrets of soap.


Tuesday, March 15, 2011

Monday Homeschool Coop Preschool

We celebrated St. Patricks Day a wee-bit early in coop. First we read, St. Patrick's Day by Gail Gibbons and I paused during the reading to introduced various activities that went with the book.


Play dough and the British Isle
I printed out an outline copy of and placed it into a protective sleeve, so that the green play dough would not stick. I told the kids to "build" the British Isle.


Sink or Float
For this activity, you need a plastic container filled with water (used spinach container), a rimmed plastic tray, objects to sink or float (We used broccoli, grape, plastic shamrock, green ring, and several animals.), and a sink or float chart placed into a plastic sheet protector.


This is Caroline and her Leprechaun ears.


We pinned the Shamrock on St. Patrick, too.


More Shamrocks
Using a plastic tray (dollar store) we sorted various sizes of shamrocks. We also made shamrock decorations with glitter and glue.


Thursday, March 10, 2011

Science Fair


The Science Fair was hosted by SERC. We have taken several classes from SERC this year and enjoyed everyone of them.

Devon wanted to drop eggs for her science experiment. We bought cage free eggs from Whole Foods, as I could not use our yummy eggs. From the science fair we walk away wanted a worm compost bin and an ant farm.


WaterColors


In our home, we have trays and baskets set up for activities. This is our watercolor tray and it includes paint brush, glass jar for water, plain paper, and prepared watercolor paper. Cutting the watercolor paper into several smaller pieces and then using watercolor pencils I drew several designs. Caroline using only water was able to paint the designs. This is really similar to the paint watercolor books that used to be widely available in the 1980's.
Valentine's Day Hearts


Materials
  • Contact paper
  • Heavy Red paper cut into a heart and then another heart cut into that heart, thus creating an outline heart
  • Tissue paper cut into dime and quarter size pieces
Cut the contact paper to fit the outline of the heart and peel off 1/2 of the white paper off the contact paper leaving 1/2 covered. Place the heart onto the sticky part of the contact paper and then place the pieces inside of the heart. Once the child is finished placing the tissue paper inside the heart, take off the other 1/2 of the white paper off the sticky and then stick the sticky to sticky. Trim the extra off and place your heart in a window to act as a stain glass.